







[vc_row font_color=”#ffffff” css=”.vc_custom_1477221309953{padding-top: 5% !important;padding-right: 10% !important;padding-bottom: 5% !important;padding-left: 10% !important;background-color: #000000 !important;}” background_style=”parallax”][vc_column font_color=”#ffffff” css=”.vc_custom_1414497512096{padding-right: 0px !important;padding-left: 0px !important;}”][vc_row_inner][vc_column_inner width=”1/2″][vc_single_image image=”382144″ alignment=”center” css=”.vc_custom_1477221153406{padding-right: 8% !important;padding-left: 8% !important;}”][/vc_column_inner][vc_column_inner width=”1/2″][vc_column_text css=”.vc_custom_1477232614844{margin-bottom: 0px !important;padding-top: 12% !important;}”]
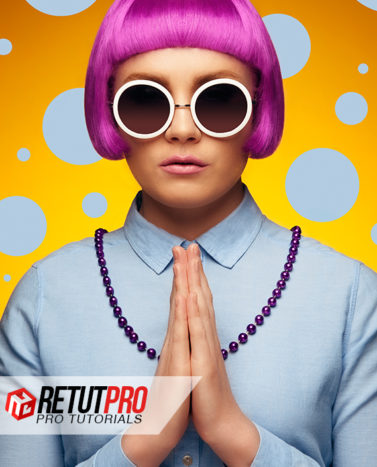
Like the edited version of the photo?
Want to see how it was made?
Get your hands on each step, every portrait retouch technique
[/vc_column_text][/vc_column_inner][/vc_row_inner][/vc_column][/vc_row][vc_row][vc_column][vc_custom_heading text=”In this video, you’ll get a step-by-step guide to every Photoshop technique used in this eye-catching portrait
” font_container=”tag:h2|text_align:center” use_theme_fonts=”yes” css=”.vc_custom_1477218237136{padding-top: 8% !important;padding-right: 10% !important;padding-bottom: 2% !important;padding-left: 10% !important;}”][vc_column_text css=”.vc_custom_1477232574997{padding-top: 3% !important;padding-right: 12% !important;padding-left: 12% !important;}”]
If you like retouching, you know there’s only one rule you go by: keep it light. No surprise there. Nobody wants to do portrait retouch to an extent that it ends up looking lifeless and fake. So the question becomes: How much Photoshop is too much?
BUT . . . honestly, wouldn’t it be cool if could stop worrying about that? If you could just apply retouch after retouch without thinking if you’ve gone too far? Be able to play around with your creative impulses because you’ve seen a professional do it before?
That’s the freedom video courses like Manni’s from Retutpro offer. And that’s why I’m always excited to bring them to you. They’re exhaustive, detail-filled, info-rich, and comprehensive (yes, I really like Manni!). And with them, you’ll be able to straddle that line between creativity and going too far.
[/vc_column_text][vc_column_text css=”.vc_custom_1477232398887{padding-top: 3% !important;padding-right: 12% !important;padding-bottom: 3% !important;padding-left: 12% !important;}”]
In this video, “Foxy Hipster,” you’ll get instruction on high-end beauty portrait retouch. Divided into 12 lessons, the 2.5 hours of the video cover everything from how he set up his lights to the final, pinpoint edits he used for both the background color and his subject’s skin tone.
After watching it, you’ll get the confidence to do portrait retouch with the most advanced tools in Photoshop, knowing you’ve seen Manni do it all before. And gain an in-depth understanding of what it takes to create world-class retouching enhancements.
[/vc_column_text][/vc_column][/vc_row][vc_row font_color=”#ffffff” css=”.vc_custom_1443496992173{background-color: #000000 !important;}”][vc_column][vc_column_text css=”.vc_custom_1477221582744{padding-top: 2% !important;padding-bottom: 2% !important;}”]
What know more about the course?
[/vc_column_text][vc_video link=”https://www.youtube.com/watch?v=QVLzZ9elJCs”][vc_column_text css=”.vc_custom_1477232432216{padding-top: 3% !important;padding-right: 12% !important;padding-bottom: 5% !important;padding-left: 12% !important;}”]In this course, you’re going to get 2.5 hours of instruction divided into 12 lessons. The download includes source files, RAW and PSD files, and bonus lessons on setting up your Wacom tablet.
After watching, you’ll be able to:
- Retouch hair using the Curves adjustment layer and other advanced tools
- Retouch skin using tools like the High Pass Filter and Gaussian Blur
- Retouch exposure using Selective Color Adjustment layer, Curves Adjustment, and others
- Plus, much more!
[/vc_column_text][/vc_column][/vc_row][vc_row][vc_column][vc_custom_heading text=”Look below for a quick rundown of each lesson. ” font_container=”tag:h2|text_align:center” use_theme_fonts=”yes” css=”.vc_custom_1477219359057{padding-top: 4% !important;padding-right: 12% !important;padding-left: 12% !important;}”][/vc_column][/vc_row][vc_row font_color=”#000000″][vc_column][vc_row_inner css=”.vc_custom_1477221766737{padding-top: 2% !important;padding-right: 10% !important;padding-bottom: 2% !important;padding-left: 10% !important;}”][vc_column_inner width=”1/2″][vc_column_text css=”.vc_custom_1477222664899{padding-bottom: 1% !important;}”]
Planning & Photography Settings
[/vc_column_text][vc_column_text]
In this lesson, you’ll learn how Manni planned out his shoot before he shot it. You’ll see how he set up his lights, background, and camera as well as get a peek inside his creative process. You’ll also see how he directs and poses models.
[/vc_column_text][/vc_column_inner][vc_column_inner width=”1/2″][vc_column_text css=”.vc_custom_1477222859311{padding-bottom: 1% !important;}”]
Light Setup & Diagram
[/vc_column_text][vc_column_text]
Knowing technical specificity is crucial for portraits like these (where even, smooth lighting is required for both the model and the background), this lesson covers the lighting setup in greater depth. You’ll learn why Manni went with four lights and poly boards and understand what each light brought to the table.
[/vc_column_text][/vc_column_inner][/vc_row_inner][vc_single_image image=”382143″ alignment=”center”][vc_row_inner css=”.vc_custom_1477221766737{padding-top: 2% !important;padding-right: 10% !important;padding-bottom: 2% !important;padding-left: 10% !important;}”][vc_column_inner width=”1/2″][vc_column_text css=”.vc_custom_1477222755611{padding-bottom: 1% !important;}”]
Preparations & Raw Conversions
[/vc_column_text][vc_single_image image=”382145″][vc_column_text css=”.vc_custom_1477232502801{padding-top: 2% !important;}”]
In this lesson, you’ll learn how the portrait was first adjusted in Camera Raw Processing and then imported into Photoshop. In this stage, you’ll see why adjusting contrast, exposure, and sharpness before you even start the portrait retouch. This will help you in the long run!
[/vc_column_text][/vc_column_inner][vc_column_inner width=”1/2″][vc_column_text css=”.vc_custom_1477222811832{padding-bottom: 1% !important;}”]
Help Layers & Notes
[/vc_column_text][vc_single_image image=”382156″][vc_column_text css=”.vc_custom_1477222976204{padding-top: 2% !important;}”]
A help layer is like an agenda. It helps you stay focused on what you wanted to change. With it, you’ll be able to go back to all the little adjustments you first noticed so that you never forget your first gut reaction.
[/vc_column_text][/vc_column_inner][/vc_row_inner][vc_row_inner css=”.vc_custom_1477221766737{padding-top: 2% !important;padding-right: 10% !important;padding-bottom: 2% !important;padding-left: 10% !important;}”][vc_column_inner width=”1/2″][vc_column_text css=”.vc_custom_1477223059265{padding-bottom: 1% !important;}”]
Comprehensive Hair Retouching
[/vc_column_text][vc_single_image image=”382147″][vc_column_text css=”.vc_custom_1477223076820{padding-top: 2% !important;}”]
Hair is the first big challenge. Using adjustment layers like Curves, you’ll work on selective areas to fill in color and kept an even exposure all over, while taking out any large, stray hairs.
[/vc_column_text][/vc_column_inner][vc_column_inner width=”1/2″][vc_column_text css=”.vc_custom_1477232753311{padding-bottom: 1% !important;}”]
Basic Portrait Retouch & Cleaning
[/vc_column_text][vc_single_image image=”382154″][vc_column_text css=”.vc_custom_1477223034751{padding-top: 2% !important;}”]
Before anything really challenging, you first got to clean up your image. Get rid any dust spots, unmistakable eyesores, and anything you can do fast. In this lesson, you’ll use tools like healing, cloning and refining.
[/vc_column_text][/vc_column_inner][/vc_row_inner][vc_row_inner css=”.vc_custom_1477221766737{padding-top: 2% !important;padding-right: 10% !important;padding-bottom: 2% !important;padding-left: 10% !important;}”][vc_column_inner width=”1/2″][vc_column_text css=”.vc_custom_1477223558361{padding-bottom: 1% !important;}”]
Liquefying & Image Adjustments
[/vc_column_text][vc_single_image image=”382153″][vc_column_text css=”.vc_custom_1477226469902{padding-top: 2% !important;}”]
The liquefying tool is powerful and can be overdone but it’s so helpful. In this lesson, you’ll learn how to use the Liquify Tool help refine an image. The idea is not to create a different person. You’ll create changes that are subtle and done with artistic integrity.
[/vc_column_text][/vc_column_inner][vc_column_inner width=”1/2″][vc_column_text css=”.vc_custom_1477223673595{padding-bottom: 1% !important;}”]
Comprehensive Skin Retouching
[/vc_column_text][vc_single_image image=”382152″][vc_column_text css=”.vc_custom_1477226485785{padding-top: 2% !important;}”]
Skin is the second big challenge and one of the most important. In this lesson, you’ll apply techniques to ensure smooth silky skin. You’ll learn tools like the High Pass Filter and the Gaussian Blur to get clear, beautiful skin.
[/vc_column_text][/vc_column_inner][/vc_row_inner][vc_row_inner css=”.vc_custom_1477221766737{padding-top: 2% !important;padding-right: 10% !important;padding-bottom: 2% !important;padding-left: 10% !important;}”][vc_column_inner width=”1/2″][vc_column_text css=”.vc_custom_1477224455387{padding-bottom: 1% !important;}”]
Fixing Sunglass Reflections
[/vc_column_text][vc_single_image image=”382149″][vc_column_text css=”.vc_custom_1477226518258{padding-top: 2% !important;}”]
In this lesson, you’ll learn how to use the Curves Adjustment to add a touch of contrast. You’ll also use Selective Color Adjustment Layer to adjust color. For light control, you’ll use the Marquee Tool to selectively pick out areas to add pop.
[/vc_column_text][/vc_column_inner][vc_column_inner width=”1/2″][vc_column_text css=”.vc_custom_1477223908400{padding-bottom: 1% !important;}”]
Dodge & Burn
[/vc_column_text][vc_single_image image=”382163″][vc_column_text css=”.vc_custom_1477226500619{padding-top: 2% !important;}”]
In this lesson, you’ll learn Manni’s famous Dodge & Burn technique. His technique allows you to emphasize the highlights and shadows of any image.
[/vc_column_text][/vc_column_inner][/vc_row_inner][vc_row_inner css=”.vc_custom_1477221766737{padding-top: 2% !important;padding-right: 10% !important;padding-bottom: 2% !important;padding-left: 10% !important;}”][vc_column_inner width=”1/2″][vc_column_text css=”.vc_custom_1477223861273{padding-bottom: 1% !important;}”]
Color & Light Control Adjustments
[/vc_column_text][vc_single_image image=”382151″][vc_column_text css=”.vc_custom_1477226545173{padding-top: 2% !important;}”]
In this lesson, you’ll learn how to use the Curves Adjustment to add a touch of contrast. You’ll also use Selective Color Adjustment Layer to adjust color. For light control, you’ll use the Marquee Tool to selectively pick out areas to add pop.
[/vc_column_text][/vc_column_inner][vc_column_inner width=”1/2″][vc_column_text css=”.vc_custom_1477225016020{padding-bottom: 1% !important;}”]
Crop & Final Adjustments
[/vc_column_text][vc_single_image image=”382148″][vc_column_text css=”.vc_custom_1477232823855{padding-top: 2% !important;}”]
After the portrait retouch is done, you need to crop and layout your final adjustments. You’ll be working with the Selective Colour Adjustment Layer to create an extra flare of color. You’ll also learn some tips on cropping.
[/vc_column_text][/vc_column_inner][/vc_row_inner][vc_row_inner css=”.vc_custom_1477221766737{padding-top: 2% !important;padding-right: 10% !important;padding-bottom: 2% !important;padding-left: 10% !important;}”][vc_column_inner width=”1/2″][vc_column_text css=”.vc_custom_1477225208531{padding-bottom: 1% !important;}”]
Adding Graphic Elements
[/vc_column_text][vc_single_image image=”382146″][vc_column_text css=”.vc_custom_1477225227616{padding-top: 2% !important;}”]
In this lesson, you’ll add bubbles to the background. You’ll work with Effects and Layer Masks to create what you see around the subject.
[/vc_column_text][/vc_column_inner][vc_column_inner width=”1/2″][vc_column_text css=”.vc_custom_1477225330993{padding-bottom: 1% !important;}”]
Final Color Adjustments & Retouch
[/vc_column_text][vc_single_image image=”382161″][vc_column_text css=”.vc_custom_1477225311049{padding-top: 2% !important;}”]
In the final lesson, you’ll add color to areas that need pop. You’ll use Solid Color layers, layer masks and Hue and Saturation Adjustment layers.
[/vc_column_text][/vc_column_inner][/vc_row_inner][/vc_column][/vc_row][vc_row font_color=”#000000″ css=”.vc_custom_1475022177224{padding-top: 3% !important;padding-right: 10% !important;padding-bottom: 3% !important;padding-left: 10% !important;background-color: #0c0c0c !important;}”][vc_column][vc_column_text css=”.vc_custom_1477226157848{padding-top: 2% !important;padding-bottom: 2% !important;}”]
BONUS LESSON: Wacom Tablet
In this bonus lesson, you’ll learn how to set up a Wacom Pen Tablet and how to use it.
[/vc_column_text][vc_single_image image=”382164″ alignment=”center”][/vc_column][/vc_row][vc_row font_color=”” css=”.vc_custom_1440465985813{padding-top: 10% !important;padding-bottom: 10% !important;background-color: #f7f7f9 !important;}”][vc_column][vc_column_text]
Want a step-by-step breakdown of a professional edit?
Learn how to use Photoshop like a pro. Know how much is too much. Buy this tutorial today!
[/vc_column_text][vc_column_text][add_to_cart_or_expire_btn][/vc_column_text][/vc_column][/vc_row]

Reviews
There are no reviews yet.